

Tsukamaki-shi – Where To Start

I have always had this obsession with Japanese swords (Nihonto), I never knew what it was about them exactly but no other sword ever had the same aesthetic appeal. Maybe it was growing up during the Ninja boom of the 80’s and 90’s where invincible warriors weilding these mystical weapons wrought shadowy vengence on their enemies or maybe i just watched too much TMNT when i was a kid and wanted to be Leonardo ?
Naturally when i started studying martial arts one of the major things i wanted to learn was how to use a Katana (Samurai Sword) and by the time i was 13 my family finally allowed me to have an Iaito (Blunt) Ninjato (Ninja Sword). This sword was ok for my first sword and i absolutely loved it! I used to finish school, go home and train for a few hours everyday and my sword was always in the vacinity. I think i was studying Jujutsu at the time as i seem to remember wearing a white Gi.
One day me and a friend of mine were training and being a bit stupid we decided to spar with our Iaito (NOT A GOOD IDEA!) and i remember we clashed swords and the end of my Ninjato flew off! My blade had snapped! That was when i realised 440 stainless is not the material for a functional sword!
I was gutted to say the least that i broke my first sword so i started learning how to fix it and convert it into a Wakizashi of sorts. Needless to say it was terrible lol! I just crushed the end of the metal Saya (Sheath) closed and attacked the end with a metal file to make it have some resemblance of a sword. This was when i first started to look into Tsukamaki as my sword was knackered and i would have done just about anything to fix it. After a lot of fiddling i figured it out and the process of perfecting it has taken me years, I’m still learning to this day.
It’s important to mention that its not easy to make Tsukamaki look elegant and its quite a complex process which is why i have never written about it until now. Patience, persistence and excellence are the true requirements to properly perform Tsukamaki, It can’t be rushed and takes a lot of practice.
You will need some tools to properly perform Tsukamaki like a Mekugi-Ana, 2 dental picks or metal tools (I use two converted watchmakers files), Rubber and amber hammer, hacksaw, some paper or tape, Hishigami (Paper wedges), rice glue, scissors and maybe some pliers. A basic Tsukamaki tool kit looks like this:

I will explain what each tool is for when going throught the Hinerimaki technique later in the post but the key tools are the picks and the Hishigami. Some people also use clamps to hold the Tsuka Ito (Cord) in place while performing Tsukamaki but I don’t personally, I learnt to clamp the Tsuka Ito in place with my left thumb and forefinger whilst tying it but this is difficult and very strenuous on your hands at first. The clamps are fairly standard spring loaded grips.

This is a good idea at first but i find them annoying as they get in the way so you may want to drop the grips once you become more proficient.
You can also use a fake Nakago G clamped to a table but these are not readily available you have to make them yourself.
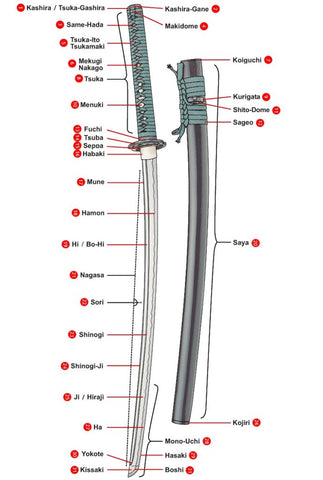
Nihonto Terminology
One of the fundamental aspects of learning Tsukamaki is familiarising yourself with the terminology used and the parts that comprise all Japanese Nihonto. Tsukamaki is a Japanese art, Therefore you need to learn some Japanese or you won’t know what your working with.
I have provided a list below of the most common terminology used in Tsukamaki:
Fuchi/Kashira – Pommel caps
Ha – Cutting edge
Hishigami – Paper wedges
Ito – Cord
Maki – To wrap
Menuki – Hilt Ornaments
Mekugi – Peg that secures the handle
Mekugi Ana – Holes in the Hilt
Mune – Back of the blade
Nakago – Tang of the sword
Omote – Outside
Ura – Inside
Tsuka – Handle
Tsuka Ito – Cloth braid covering Tsuka
Same – Shark or ray skin
Materials Required
The basic materials used for Tsukamaki are the Ito, paper and glue.
The glue needs to be sticky but not absorbable as if you use Gorilla Glue or superglue you will ruin the Ito as it will soak up the glue and solidify. The best glue for Tsukamaki is produced by boiling rice, working it into a paste while its warm and adding a very small amount of water to create rice glue.
When making Hishigami the paper can be almost any weight, I tend to use A4 but ideally it should be relatively close to a newspaper thickness. You have to be careful using newsprint though as the ink can run and again mark the Ito.
You should moisten the Hishigami before placing them as this will allow the Hishigami to conform easier to both the Tsuka Ito and the Samegawa.
Tsuka Ito is available from the shop (Ningu) in a wide variety of colours and is only manufactured using two different types of fibres, Natural and synthetic. If you are unsure what your Ito is made from then a burn test is often helpful to indentify it.
Tsuka Ito Lengths
This varies according to the length of the Tsuka that you are wrapping and the Ryuha of the sword, Its best to overestimate rather than underestimate how much Ito you will require as although their are a number of techniques and forumlas to estimate the required length, their isn’t one thats infallible. A simple guideline is:
Tanto – 4” Tsuka – 6ft of Tsuka Ito
Wakizashi – 6” Tsuka – 8ft of Tsuka Ito
Katana – 10” Tsuka – 12ft of Tsuka Ito
However if the Tsuka is for a Kukishinden Ryu Katana or Oniyuri Bujinkan Katana the Tsuka are alot longer so the Ito required would be approximately 16-18ft.
Tsuka Shape
One of the most commonly overlooked aspects of Tsukamaki is the shape of the Tsuka itself. When you buy a production sword its somewhat like buying an iPad with factory settings, you have to add your apps and info to make it yours. One of the most common complaints people make about their swords is that after a while the Tsuka becomes uncomfortable to hold or it feels too thin.
This is easily remedied by removing the Tsuka Ito and adjusting the Tsuka itself.

This is done in a number of ways but the easiest is to apply paper strips to the Ha (Blade Edge) and Mune (Blade Spine) edges of the Tsuka to pack the handle out and make it thicker.
It’s important that you glue each strip down like paper mache as this will keep the Ito in place and also stop the paper moving around and messing up your Tsukamaki. The paper should be wide enough to touch either side of the Samegawa but not obscure it once the Ito is applied. This will also stop the Ito snaring on the rough face of the Samegawa.
Continue layering the paper until the edges are flush with the Fuchi and Kashira once the Tsuka Ito has been applied. This is done by taking a length of Tsuka ito and checking the depth as pictured below.

This process is also known as preparing the Tsuka. I have owned more Nihonto than i can count and until i realised that the Tsuka needed shaping i believed i’d only ever found the right sword for me a few times as all the rest didn’t feel quite right. Turns out i just prefer a fatter Tsuka personally as factory made Tsuka feel uncomfortable in my hands as they are quite big. My point is that if your sword feels uncomfortable in the hand, your Tsuka probably needs packing out.
I tend not to do this last part but its relevant for applying Hishigami. Measure and mark the Ha and Mune sides of the Tsuka in sections of 1 width of the Tsuka Ito. The distance between the Fuchi and Kashira should measure an odd number of width units along the Ha and Mune sides. If the width measurements are not odd then the Tsuka may have to be altered or a different weight of Tsuka Ito may have to be used in order to fit with the odd number of spaces. This also largely depends on the style of Tsukamaki your are practising as some styles simply won’t fit if you don’t use this guideline but its not so much of an issue for Hinerimaki Tsukamaki (Diamond Wrapping). It is an issue for Katate Maki for example as the end knots won’t fit on the Tsuka.
At this point you usually produce you Hishigami ready to start wrapping however i will discuss making Hishigami in a later blog post. Hishigami are small paper triangles used to space out the Tsuka Ito and keep it symmetrical when wrapping. An example is provided below:

Hinerimaki Tsukamaki – Where To Start
Once you have finshed preparing your Tsuka and Hishigami its time to start Tsukamaki. It should be mentioned that its tradition for the Tsuka Ito to be placed on the Omote side of the Tsuka regardless of the style. You can determine the Omote side of the Tsuka by looking for the Kurigata (hole for the cord) on the Saya which always faces out from the body when the sword is worn.
Before you start wrapping the Tsuka theirs a few steps to go through:
1. Take the Tsuka Ito, find the middle and fold perfectly in half.

2. Place the first two Hishigami on the Ura (Inside) of the Tsuka and align them with the marks on the paper strips packing out the Ha and Mune sides of the Tsuka.
3. Place the middle of the Tsuka Ito on the Omote side of the Tsuka and make the first two Tsuka Ito folds overlap the Hishigami on the Ura side of the Tsuka. The left side of the Ito is folded first and the right side of the Ito overlaps the left.

4. Bring the two lengths of Tsuka Ito around to the omote side and make the next two folds. Hishigami should either be placed already or placed as you perform the Tsukamaki.

5. Continue the Tsukamaki process alternating the direction of the folds as you go.

Bare in mind that earlier i mentioned their are a variety of ways of doing this, I do it by hand but many people use clamps ?
Its important that your Tsukamaki is tight, after each fold its important to pull fairly hard and draw the Tsuka Ito into shape around the Hishigami. It’s really important that your Tsukamaki is not loose or you will have to start again.
Throughout the process continually monitor and adjust the symmetry of the folds and spacing and try to maintain a smooth surface along the Ha and Mune edges of the Tsuka.
Perfect Tsukamaki is extremely tight and precisely positioned, you should not be able to move the folds in the Tsuka Ito once drawn over the Hishigami on the Tsuka.
Placing The Menuki

Placing the Menuki on your Tsuka in the Hinerimaki style is fairly simple, The Menuki are placed 3 folds up on the Omote side of the Tsuka and 3 folds down from the Ura side knot of the Tsuka.
In the case of a Wakizashi or Tanto the Menuki are usually placed after the second set of folds on the Tsuka.
It varies according to the style of Tsukamaki being performed, the size of the Tsuka, the size of the Menuki, Ito width and the placement of the Mekugi Ana.
Tying The Ura Side Knot

Once you have reached the Kashira end of your Tsuka you will need to tie the Ura side knot.
Pass the end of the Tsuka Ito coming from the Mune side, over and under the fold formed by the crossed Tsukamaki.
Then pass the end from the Ha side over the Mune side Ito and under the Tsukamaki folds on the other side locking the Mune side Ito in position.
Take the Ha side Ito and fold into a loop and then bring it back under the Tsukamaki folds.
Thread both ends through the Shitodome and the Kashira so that both ends of the Tsuka Ito are poking through the Kashira on the Omote side.
Tying The Omote Side Knot

Pass both lengths of the Tsuka Ito under the top set of Tsukamaki folds.
Then take the Ha side length and loop it under the top Tsukamaki folds to form a tight band around them. Cut off excess and tuck into the band.
Now take the Mune side lenght of Ito and fold it into a loop passing it back under the Tsumakai folds on the other side of the band.
The Ito should now be pointing towards the Kashira, simply repeat the process of folding into a loop and passing the Ito back under the Tsukamaki folds on the other side on the band around the centre of the Tsukamaki folds.
Now cut off the excess length of Ito as close to the now formed Omote side knot as possible and tuck in any excess.
Your Tsukamaki is now complete and should look like this:

Finally if the folds of your Tsukamaki aren’t quite symmetrical, take a spoon or a ruler and use the edge to push the base of the folds into your Hishigami. DON’T use your picks! If you slip you will pull the weaving of your Tsuka Ito and form a loop which will effectively ruin all the work you have just completed. Use something rigid but with a round edge.
This post is by no means a comprehensive breakdown of the entire art of Tsukamaki but an insight into one of the most common styles (Hinerimaki/Ito No Maki) of Tsukamaki. It quite literally only scratches the surface but it is a good place to start.
I will write more about the differing styles of Tsukamaki, Making Hishigami, Tying Sageo and anything else Tsukamaki related in my following blog posts but this post will turn into a book if i continue.
It takes time and practice to get it right but after your first few failed attempts you will get to grips with it! It’s a fiddly process but if your an avid practitioner of Kenjutsu its an essential skill.
Its suprising how many martial artists own Nihonto but let them fall into a state of complete disrepair, It’s been more than a few times that i’ve walked into a Dojo and seen the Nihonto on the wall has the Tsuka Ito hanging off, with the instructor clueless on how to tie it back into position. I always assumed it was part and parcel of the art.
However…..
Should you need restoration work done on the swords in your dojo please do not hesitate to contact us (www.sealmartialarts.com)
I hope you find this post useful in your training.
I will add pictures of how to tie the Ura and Omote side knots shortly.